Sunday, 4 November 2018

Six of the Best

It feels like only last week that I uploaded the last batch of squares, but I've got six to load today.

SS2 - Let Sleeping Dogs Lie by Nicole Vos Van Avezathe.

The designer designed this block with a sleeping cat and called it Cat Nap but you're most likely to find a dog sleeping on mine.  My daughter's dog, Molly, is a frequent visitor and spends a couple of nights most weeks with me.  She loves spreading out on my bed for her afternoon nap, so I found an image on the internet, resized it, and sewed it into my block.  This block went together very easily, with choosing and sewing the dog taking up most of the time.


Time to make: 4 hours  No. of pieces: 4

SS2 - Betty's Bloom by Carl Hentsch

I've changed this block up a little from the original as I found the fabric placement  too busy and the shapes were lost.  By using plain colours instead of floral and only one strong pattern, the spots, I've defined the shapes a lot more.  This block was foundation pieced and so was fairly quick to put together and made matching up seams very precise.  However, I've changed out the original square in the centre for a circle so it's neater and less bulky.


Time to make: 3 hours  No. of pieces: 33

SS2 - Fruit Bowl by Jo Avery

This was a pleasant block to put together.  Once I'd made the circles using my Perfect Circles by Karen Kay Buckley the applique didn't take too much time.  Instead of my usual machine blanket stitch I hand stitched the fruit using invisble thread.  I felt that the edges of the bowl needed a bit more definition to them as it seemed to merge into the background so I did lines of backstitch around it in a deeper colour.  I added the ric-rac braid to take away the hard lines on the top of the bowl.


Time to make: 3 1/2 hours  No. of pieces: 7

SS2 - Cathedral Windows by Jenny Doan

It was purely a coincidence that this block came out the week that I visited Winchester Cathedral's most fantastic Flower Festival. using the inspiration of the 12th century Winchester Bible.  Jenny designed this block using five different patterned farbrics, which is at least three too many for me, so I simplified it by using only one.  Through my window you can see an embroidered display of flowers, using the colours that were the theme of  a lot of the displays in Winchester.  This simplified folded and machined method of construction makes for a much more bulky middle than the traditional hand pieced block.


Time to make : 3 hours  No. of pieces - 9

SS2 - Flower Child by Carolee McMullin

I have done this block almost as the designer intended.  I did change out the four-block construction for just one whole square and I've used less colours, keeping to a pink pallette for cohesion.  Just to make it my own I've added a few touches of hand embroidery.


Time to make: 3 1/2 hours  No. of pieces - 16

SS2 - Radio Waves by Pat Sloan

A neat little pieced block with simple shapes made for a quick block to construct. The original had just a plain centre so, of course, I had to add soemthing in there.  I like to sit and drink tea when I'm listening to a radio play in the afternoon so a little cup of lemon tea managed to find it's way onto my block.


Time to make: 3 hours  No. of pieces - 21


Sunday, 7 October 2018

Splendid Sampler 2 - Fun Times

I'm still plodding on with these blocks each week.  I've got a bit of catching up to do but I'm getting there.

Splendid Sampler 2 - Tulip in Bloom by Nadra Ridgeway

This one looked a fairly easy block to complete.  However, looks can be deceptive.  It took me for ever to decide on the fabrics, as usual.  I went with yellow for th flower head as I used to have lovely large yellow tulips in the border at the front of the house.  They always put on such a show in the late spring after the daffodils had died down..  the flower head on this went together very easily and quickly, nothing difficult there.  Then I got to the leaves.  I don't know how I got so confused with how to line up those diagonal joins.  Must be my poor spatial awareness kicking in.  The seam ripper came in very handy.  I sewed it again and had to rip it out again.  Third time lucky! I finished it off with a bit of big yellow stitching around the inside of the flower, but it doesn't show up very well. 


Time to make:  3 hours  No. of pieces: 16

Splendid Sampler 2 - Free as a Bird by Irene Black

I decided to make my bird a yellow canary.  I used fusible applique, sewn with machine buttonhoe stitch.  The branch in the pattern was made from  a bias strip but I used a bit of ric-rac for a bit of texture and added a flower to the end cut out from a scrap of fabric. the yellow fabric didn't stand oout so well from the grey stripe so I edged the bird in back stitch with yellow thread to give a bit more definition.


Time to make 3 hours No of pieces: 9

Wednesday, 19 September 2018

Blue Butterfly Bag - Ta-Da!

This is my Blue Butterfly Bag by Australian designer Gail Pan.  I first saw this bag on a Facebook group and fell in love with it.  I sent away for the kit and pattern and it sat for a couple of months in a drawer while I got on with other things, but then I was going on holiday and I wanted to take something small to do to while away a few hours sunbathing on the cruise ship, so I marked up the panels and took the embroidery sections with me. I didn't actually get much done but when I got back I carried on with it and the embroidery was soon finished.


 Having finished the embroidery I was keen to get on and make the bag and not let it lie around unmade.  I tend to think things over for far too long and then lose impetus but I just bit the bullet, took the bull by the horns, and just got on with it.  I'd ordered some supplies online and they were delivered very quickly so I had no excuse.

The outside of the bag was a fairly easy make, just simple cutting and stitching by machine.


I adapted the original pattern a bit. I added Bosal foam interfacing to make the bag stand up on it's own. This did make the seams a bit thick so if I use it again I will cut it slightly smaller than the top piece so that it's not in the seams.

I also added a zipped pocket inside. I used my friend Youtube to find a suitable tutorial of how to insert a zip and found one that was quite easy to follow.  It does help when I can see somebody actually doing it, rather than just written instructions and a picture. I also added a facing to the top of the lining.


I finished the bag with some big stitch hand quilting and some grey ric-rac to cover the joins.
I wish I had added some sort of fastening to close the top but I thought I would just be using this bag as a carry bag for taking a small project to Craft Group, but it's actually just the right size for using as a handbag when I go out for the day.  I might try to think of some way of adding an afterthought  tab closure to the top.  Next time I will try an inset zip closure along the top. 


I've got a lot of French General scraps in reds so I'd like to make another in that, with my few adaptations.  I might even find a different bit of embroidery too.

Saturday, 18 August 2018

Being laid up has it's benefits

Not being able to walk around and being forced to rest my fractured foot really does have it's benefits.  It means I can sit and sew, or knit, or crochet without the guilt feeling that I really should be doing something else. So this week I've been catching up on all three.

Firstly, here's this week's block for the sampler quilt SAL.

Splendid Sampler 2 - Around Four Corners by Rachaeldaisy.


This one was easier to execute than it first looks.  

The first hurdle I have to jump over is choosing the right combination of fabrics. As I'm going all out scrappy with this one I haven't got a dedicated matching set of designer fabrics to fall back on.  But being scrappy doesn't mean I can just use the first thing I pull out of the scrap basket.  They have to go together.  I decided I wanted a dark background for this block and then chose four different spotty fabrics for the circles.  I actually cut them out and made up one circle, but when I put it on the background block it just looked too busy, and the circle was indistinct.  I knew it wasn't going to work with four differenet patterns.  The background was already patterned so it needed plains to stand out.  I chose the four colours that are in the flower motif, and luckily, I happened to have pieces of each of the colours.

 I used my Kay Buckby Perfect Circles to make the circles and am very pleased at how smooth and round they are.  I appliqued them onto the backing square with invisible thread.

Time to make: 4 hours  No. of pieces: 17

I've now made nine blocks for ths quilt.  This last block really stands out from the others as it has a dark backgound.  I shall have to make sure that I include others with darker colours in them so that they blend in with all the others.


I've also finished the embroidery part of a bag I want to make.  It is the Blue Butterfly Bag by Gail Pan.  I took it away on holiday with me and made a start on it but didn't get as much done as I thought I might.  This panel will make three of the blocks in the patchwork design.


I've sent away for a few supplies that I need to make the bag so will get on with other projects while I'm waiting for them.


Tuesday, 14 August 2018

Five Blocks for the Splendid Sampler 2

Yes, you read that right.  I have five blocks to share.  I've been away on holiday, a lovely cruise around the western Mediterranean Sea, with my eldest daughter. It was a very relaxing time with a lot of our time spent on the sunbeds, mostly in the shade, just chilling out,  I did take some sewing with me - a bit of embroidery that will be inserted into a patchwork bag.  I've nearly finished the panels and will start on putting the bag together soon.  I've got lots of time resting up at the moment as I've managed to fracture a bit of arthritic bone in the top of my foot.  Rest is required and I have a strappy boot to wear when I go out - no plaster required, thank goodness.  Anyway here are the blocks, one at a time.

Splendid Sampler 2 - Balance by Wenche Wolff Hatling


Love this cute block.  Mine is slightly different from the original design.  I thought his trunk looked empty so added a kite. Also my elephant is actually balanced on the tub whereas the original has him floating above it for some reason.  I chose the checked fabric because it reminded me of Elmer the Elephant and I chose to do separate plain ears instead of embroidered ones.  I used fusible applique and sewed it onto the backing by machine, using a blanket stitch.  The background is yellow but doesn't show up well in the photo.

Time to make: 2 1/2 hours  No. of pieces: 6

Splendid Sampler 2 - Point Taken by Susan Ache


The title of this one relates to the fact that the star points are chopped off, something we try not to do when sewing stars. It took me ages to choose just the right fabrics for this one and I'm pleased with my selection..  My little added extra is the line of sttiching around the central squares.  I thought the block looked naked without it.

Time to make: 3 1/2 hours  No. of pieces: 32

Splendid Sampler 2 - Rose and Dot by Lori Kennedy


This was a fairly simple block to put together. I used fusible applique and applied it to the backing by machine using a small blanket stitch. The extra purple and green hand stitching is my own addition to the design.

Time to make: 2 1/2 hours  No. of pieces: 7

Splendid Sampler 2 - My Flock by Brenda Ratliff


I decided to paper piece the central block of this one instead of the more traditional way of making flying geese.  I didn't want to risk stitching off those lovely sharp points or sewing them together wonky which is so easy to do.  My head was very worried about the block being off centre as I do like symmetry but I went with it this time.  But it looked wrong.  That right hand space looked empty and was just crying out to be filled, so I added a simple scroll in hand stitching.  Much more pleasing to my eye now.

Time to make: 2 1/2 hours  No. of pieces: 14

Splendid Sampler 2 - Flowering Tree by Amy Friend


This block was paper-pieced.  I'm in two minds about paper piecing.  It does use up a lot of fabric but it does enable you to make lovely sharp, accurate points which would be almost impossible in normal piecing. As usual, the rebel in me had to add something to the original design and I've added a bit of stitching to round off the sharp angles.  I wish I'd chosen a green fabric for the bottom two triangles as it would then look like a tree on the grass with sky behind it, but I've only just seen that now it's in front of me on the screen. 

Time to make: 3 1/2 hours  No. of pieces: 20

That's all for now.  I'm looking forward to Thursday to see what the new block will be.  If there's no stitching on it you can bet that I'll find a way of adding some.


Sunday, 8 July 2018

Clamshells


Splendid Sampler 2 - Clamshells by Helen Stubbings 


This block was extremely challenging, and not just for me.  Lots of others in the Faceoook group have said the same.  Clamshells are a really odd shape.  You can't just cut and machine stitch like you can with normal shaped patchwork.  These need to be prepared before you can stitch them together by hand, and it's quite difficult to get a smooth, round shape.

I followed the instructions that were given with the block, watched a video or two on Youtube and made a right mess of it.  You have to cut out a template, stick it to the back of the fabric, cut 1/4 inch around the template and then fold over that seam allowance and stick it down.  Glue got everywhere and I lost the roundness completely.  I couldnt get the template out so had to sort of cut it out but was left with half of it still left in.

Thought I could just do it by cutting out the shapes and just applique them to the background by machine. This did work, but it didn't look very good.   I left it a day or two and then started thinking again.  The clamshell shape is basically a circle with the sides cut out.  I thought that if I just made circles and layered them I could get the same effect. I'm a fan of Lori Holt and she does applique shapes using interfacing so I loooked it up and gave it a try.

I drew circles onto lightweight fusible interfacing.  Placed it bumpy side down on top my fabric which was right side up. Then I machine stitched all the way around the circle right on the drawn line.  Then cut a small cross in the centre of the interfacing and carefully turned them right sides out.  Carefully poked the edges to make a nicely rounded shape and finger pressed the edge. I layered them onto the block and ironed them in place. I then used invisible thread to handstich them in place.  One problem with using invisible thread is that you can't see it!  I didn't want to see the stitches when I'd finished but I would have liked to be able to see it to thread the needle!  Quite a long-winded process but it gave reasonably pleasing results.

I like to make a little story for my blocks if I can and so I chose a blue background to represent sky and scrappy greens  for my clamshells to make it look like rolling hills.  I embroidered all three flowers in red for impact.  There was a lot of bare blue sky so I embroidered a couple of little butterflies as well.

It was a long process but I got there in the end.  I actually enjoyed working this one and seeing how I could get better results with a little bit more effort.  At one point I was stitching away on the machine between 2 and 4 in the early hours of the morning as it was so hot and I couldn't sleep.

Time to make:  20 hours (at least)  No of pieces:  10

Saturday, 23 June 2018

I don't do Milk & Cookies!


Splendid Sampler 2 - Milk & Cookies by Rebecca Bryan 

renamed Tea & Biscuits by me.


This week's block for The Splendid Sampler 2 is called Milk & Cookies.  I don't drink milk and I call cookies 'biscuits' because I'm English.  I am rather partial to 'tea and biscuits', though. The large, plain appliqued circle in the middle was just crying out to me to be customised in some way so I've stitched a little teapot.  I think I will rename my block 'Tea and Biscuits." In SS1 I did all the applique bits by machine but I've done this one by hand and found it very satisfying.

It took me forever to decide on my fabric combination so I haven't included that in my statistics. I am a rather slow stitcher, though.

Time to make: 6 hours  No of pieces:  21


Tuesday, 19 June 2018

Change of Plan

I was putting my new block away with the ones I'd made previously and came across a drawer full of multi-coloured scraps that I've been saving.  Wow, have I saved a lot. I then remembered what I was collecting and saving them for. I thought that when I had enough variety and colours I would use them to make a sampler quilt when a QAL came along that I like the look of. Well, Splendid Sampler 2 has come along and I know I thought I would just carry on making them in French General and mix them in with the already made blocks from SS1.  I've got 48 blocks made so far.  I never intended to make all 100 blocks as I don't want a huge quilt, so I'll carry on and make a few more in FG from the SS1 book and start anew on SS2 in my scrappy, happy colours.  So here's the first one again.

Splendid Sampler 2 - Quilt Market by Alex Veronelli


 I liked doing the embroidered blocks in SS1 so I'm hoping there will be some more in SS2.  I'm thinking I will try to incorporate a bit of stitchery in more of these blocks, if the design allows for it. I didn't want to overload on this one so just added  a few straight lines.

 Time to make: 1 1/4 hours  No. of pieces: 21


Sunday, 17 June 2018

Splendid Sampler 2 - and we're off

Wow, it's nearly two years since my last post.  Time flies so fast, doesn't it.  I haven't done any patchwork in all that time, but I have been doing lots of crochet, knitting and cross stitch.  I needed something portable as I was spending more and more time looking after my aged father, so the patchwork got put aside. Dad died a year ago this month but I got caught up in so many other things that sitting down at my sewing machine hasn't been high on my agenda.  However, now that Pat Sloan has started The Splendid Sampler 2 Sew-a-Long I was itching to make a start on something new,  I love sewing along with all the other people and get so much inspiration fom seeing all of the different takes on the block.  I'll  just add these blocks to the ones already made from the first Splendid Sampler.

It did feel good to get my stash of French General out again and go through it to find some scraps for this first block.  I can't wait for the next block to come out.

Quilt Market by Alex Veronelli


Wednesday, 21 September 2016

Splendid Sampler Update

I've lost a bit of momentum on these blocks over the summer.  I haven't had much time to sew or to blog.  Dog-walking, caring for an aged parent, and spending time with the grandchildren, have filled my days, but now the children are back at school and my life seems to have quietened down a bit i hope to get caught up.  Here are a few blocks I have managed to complete.

#26 Dreaming of dresdens
 This was a fairly easy block to make designed by Jane Davidson.  I kept the blades to just 2 colours as I didn't want it too fussy.

#44 Stitch in the Garden


This block, by Gail Pain, combined a touch of applique with embroidery.  I kept to just redwork for the stitching to match all of the embroidered blocks in this quilt.  I outlined the reels with stitching to create more impact as they didn't seem to stand out.

#46 Twirl Time


 This block, by Sarah J Maxwell, took a lot of my time to choose just the right combination of fabrics and then the placement of them.  I love the way the legs appear to be running away.

#47 Circle of love


A block by Geta Grama.  I cut this one out all in one piece and appliqued by machine.  The original was cut out all in little pieces, but as I've only used one fabric, it was easier this way.

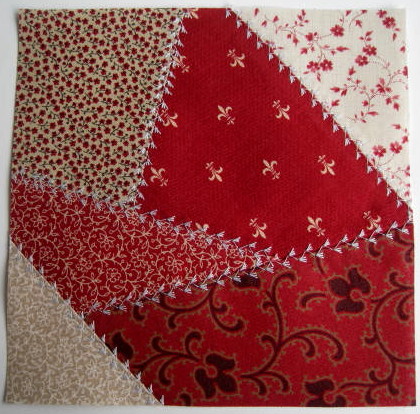
#48 Whim


Another one that took me ages to choose the right fabrics for.  I paper-pieced this one and used the very under-used embroidery stitches on my sewing machine for the crazy quilting.  Love it!

#49 Summer's Gift


A combination of piecing and applique designed by Karla Eisenach.  I cut the outer petals all in one piece rather than separate petals.  It made it much easier to get the placement right.  Fussy cutting for the centre.

#57 Starting Point


A quick and simple little block by Lissa Alexander.  The original has a 4-patch in the centre but I simplified it a bit.

Saturday, 17 September 2016

Star Sampler Quilt - Finished!

I started this quilt back in 2013 and it is, at long last, FINISHED!


The journey began on this one because I had a lot of the blue scraps left over from another quilt I had made.  They are all from the same line - Chambray Rose by Shabby Chic. I didn't want another blue quilt so I searched around and found the red fabric, which seemed to match the shabbiness.  The red is Clermont Farm by Moda.  I kept the background nice and simple with Kona Snow.


It started of as a Combined BOM for 2013, using blocks from many different BOMs, but then I hit a stumbling block as there were some block designs that just didn't seem to fit, so as I found a block I liked, I included it in this quilt.  The early blocks all seemed to have a star-like theme so I continued to find other starry blocks. 


The quilt top was finished in June 2013 and I decided to quilt it by hand.  I found a cotton quilt cover in Ikea in a lovely Toile de Jouy print that made a lovely backing.  It was a fairly thin cotton with a not-too-tight weave, so ideal for hand stitching, and it only cost about £10, I think. I chose a luxury bamboo batting to see what it was like.  It's so soft and silky and quilted easily.  It's wonderfully warm, too.


I thought it would take me the winter to complete it.  How wrong was I!  It's easy to get bored with the same project, and I had other smaller projects that needed my time so it got put on the back burner for months at a time.  When the summer came it got put away completely.  It's no joke trying to sew in the heat with a quilt on your lap.


The quilting is fairly dense all over, and I realise now that it needn't have been.  Mostly it is straight lines following the patterns in  each block, but for the sashing I used a template.  For the border I went back to straight lines.


I didn't have enough of either the blue or the red fabric to do a binding, but then I came across this super easy flange binding.  Because the strips are cut narrower and then joined together I just had enough.  The joy of this binding is that it is all completely sewn on by machine.  Definitely will use this method again.


All of the pictures were taken in my daughter's gorgeous garden.


Tuesday, 12 July 2016

Two more Splendid Sampler blocks

#40 Flights of Fancy

This block is designed by Barb Groves and Mary Jacobson of Me and My Sister.  It's another block that is made up of 36 x 1" finished squares.  I made the half-square triangles using the 8-at-a-time method, cut out my background squares and then ironed them all onto Pellon Quilter's Grid.  I then folded and stitched down the seams and sliver cut the seams to press them open. The seams match up perfectly using this method but it does make the block a bit firmer than the others but I don't think that will matter when they are all sewn together and quilted. I've deviated from the designer's choice of fabric placement by only having one colour for all of the stars and also having solid centres. 


#41 Sew South 

This block is designed by Jennifer Mathis.  I used some paper 1" hexagon templates that came free with a magazine. I knew they's come in useful one day. I've modified the design to make it a bit easier.  The original has an exploded group of hexagons; each hexie sewn to the background separately, with about 1/8" in between each hexie.  I've chosen to sew all of my hexies together first and then applique them to the background using my machine blanket stitch.


I've now decided on the setting for these blocks and have bought the fabric and washed and pressed it ready to cut out.  I shall be sewing the sashings on each individual block over the summer so that when I have made enough  blocks I can decide on placement and then sew them altogether.